Plugins for WordPress are bits of software that can be easily added to your blog or website to expand its functionality. A core feature of WordPress, plugins can help you create more engaging sites, as well as manage them better. As of October 2015, there are 40,542 plugins in the official WordPress Plugin Directory, which enable you to do just about anything you can think of with your site in terms of theme design and functionality, social media integration, search engine optimization, or security and spam protection.
Free Versus Premium WordPress Plugins
Most plugins for WordPress are free to use, whether you get them from the Plugin Directory or from other sources, but then there are some plugins that cost money. Premium plugins may cost anywhere from a one-time-only payment amounting to a few bucks, to a monthly subscription fee. Because WordPress is a free, open-source platform, it may sound a bit strange that some plugins cost money. But paid plugins tend to have two major advantages.
First, they offer features that no other plugins offer, or are so well optimized and polished that although other plugins offer similar features, they have an edge over them. Second, paid or premium plugins almost always come with dedicated support. In other words, after you buy the plugin one or more expert developers will be willing to answer your technical questions and help you troubleshoot any errors you may encounter. This is very important if you use many plugins with your WordPress site because sometimes different plugins may have conflicting bits of code that lead to compatibility problems and errors which someone without coding expertise may not be able to fix.
Installing WordPress Plugins
Now let’s see how you can add plugins to your WordPress installation. Most plugins can be quickly installed through the WordPress Dashboard. After logging into WordPress, go to Plugins, and then click on the Add New button.

Search for the plugin that you want to add. You can use the Search Bar to search for plugins by name or tags on the official WordPress Plugin Directory, or else discover plugins through the Featured, Popular, and Recommended categories. Whatever plugin you choose, make sure it’s compatible with your version of WordPress. Be wary of plugins which appear as ‘Untested with your version of WordPress’ — these may have a reduced functionality.
1. Install the Plugin
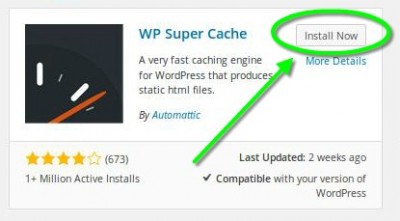
To install a plugin, click on the Install Now button next to the plugin’s name. Before installing a plugin, you can click on the More Details link in the plugin overview to view a more in-depth description of the plugin, frequently asked questions about it, and additional installation instructions.


2. Activate Your Installed Plugin
By default, an installed plugin is inactive and lies dormant in your Plugins section. To activate it after installation, simply press the activate button.

3. Install a Plugin Via a ZIP File Upload
There is an alternative way to install a WordPress plugin. This method can be used with plugins which for some reason or other don’t appear in the Plugin Directory. For this alternative method to work, you have to first download the plugin .zip file from the developer’s website. Once you do that, go to Plugins > Add New and choose the Upload Plugin option.

Choose the plugin .zip file from your computer.

Once the plugin file has been uploaded, click Install Now. It will take only a couple of seconds.

After the plugin has been installed, Activate it.

4. Configure Your Newly Activated Plugin
Whether you’ve installed your plugin through the WordPress Plugins Directory or by uploading the plugin .zip file manually to WordPress, you may have to configure its settings before you can use it. Not all WordPress plugins have settings, but the more advanced ones do. Go to Plugins > Installed Plugins. Here you will see a list of all the plugins you’ve installed so far. Find the Plugin you want to configure and click on Settings.

Notice how some plugins add new tabs to your WordPress Dashboard. You can directly click on the Plugin name in the Dashboard to see available settings. Configuring plugins is going to be a lot easier if you follow the instructions and guidelines provided by the developer.
Getting Rid of Plugins
If a plugin no longer works properly, or if you don’t need its functionality anymore, you can simply deactivate it in the Plugins > Installed plugins tab.

If you want to remove a plugin from your WordPress installation, you can Delete it, which is
the same as Uninstalling it. Before you can Uninstall a plugin, you have to first Deactivate it.
There is no limit on how many plugins you can use with WordPress, but having too many, literally hundreds, may slow down your site and lead to compatibility issues between them. That’s why it’s important to choose the plugins you install with care, to make sure they come from a reliable developer and are compatible with your current version of WordPress.
In the end, whether you use WordPress as a personal blogging platform or as a content management system for a business website, make sure you make the most of the awesome functionality that plugins can add to your WordPress site.
Leave a Reply